Last Updated on 10. October 2026 by SuffocationLink status: OK
Controlling a servo with the Raspberry Pi 3.
Hierbei geht es nur um die grundlegende Technik, der Einsatz könnte beispielsweise ein mobiler Roboter sein.
Der Servo soll hierbei über den Software PWM angesteuert werden, um die Hardware PWMs für andere Funktionen frei zu halten.
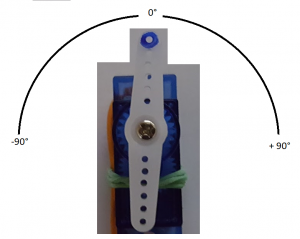
Zusätzlich soll der Servo nicht wie üblich über Integer Werte gesteuert werden, sondern über eine Gradzahl im Bezug zur Mittelstellung des Servos.
Das unten stehende Bild zeigt, was hiermit gemeint ist.
Auf die eigentliche Funktionsweise eines Servos gehe ich hier nicht ein, dies kann bei Bedarf bei http://rn-wissen.de/wiki/index.php/Servos oder anderen Websites nachgelesen werden.
Required hardware
- PI3 (oder älter, bitte auf die richtigen Pins achten)
- Standard Servo
- Diverse Cables (Pre-assembled Pin Header Cables)
Circuit arrangement
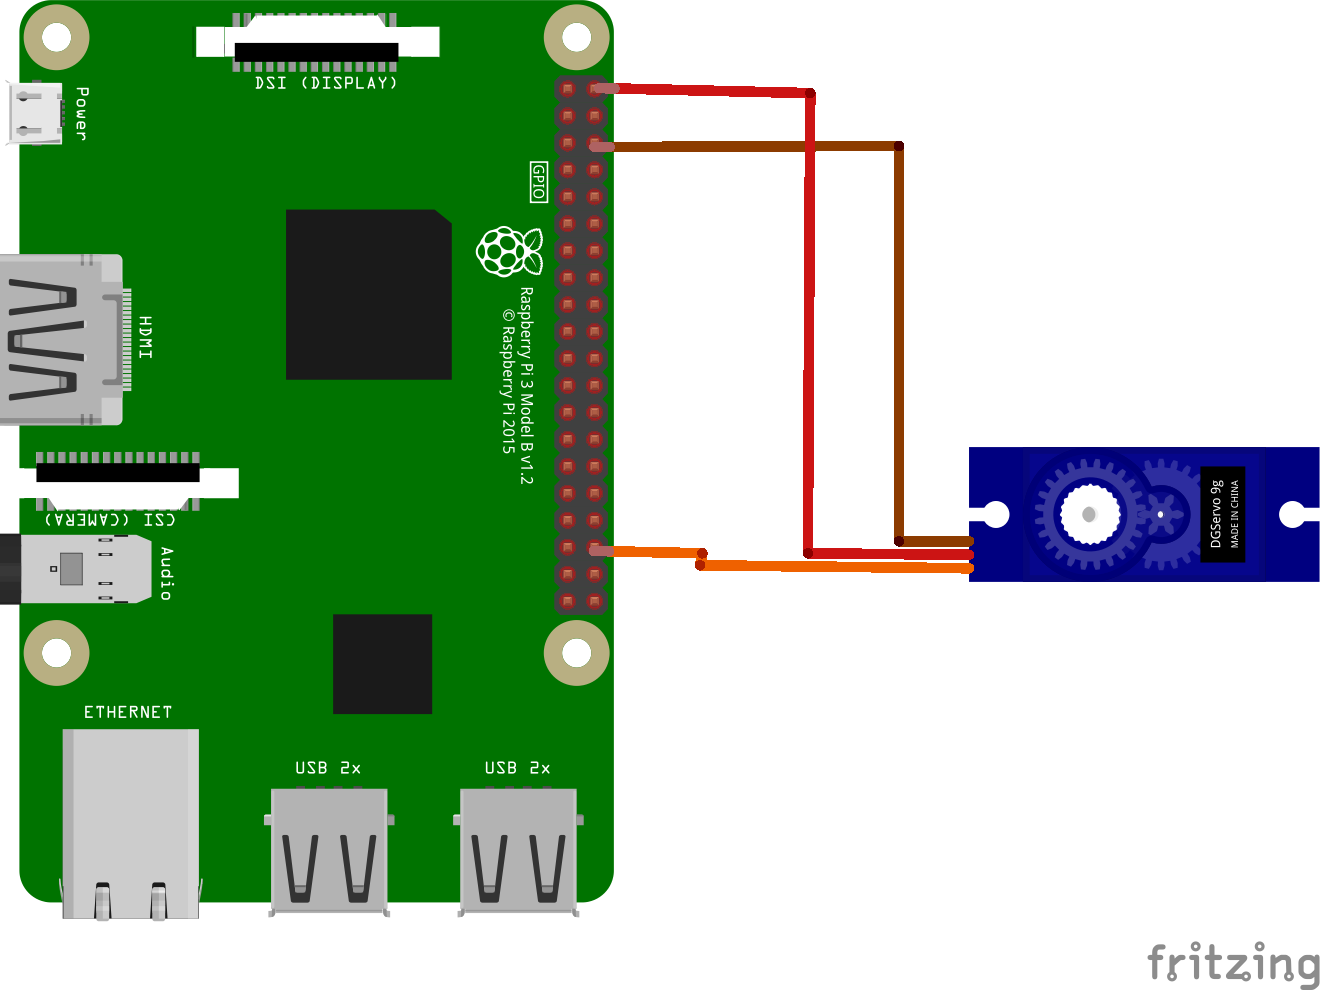
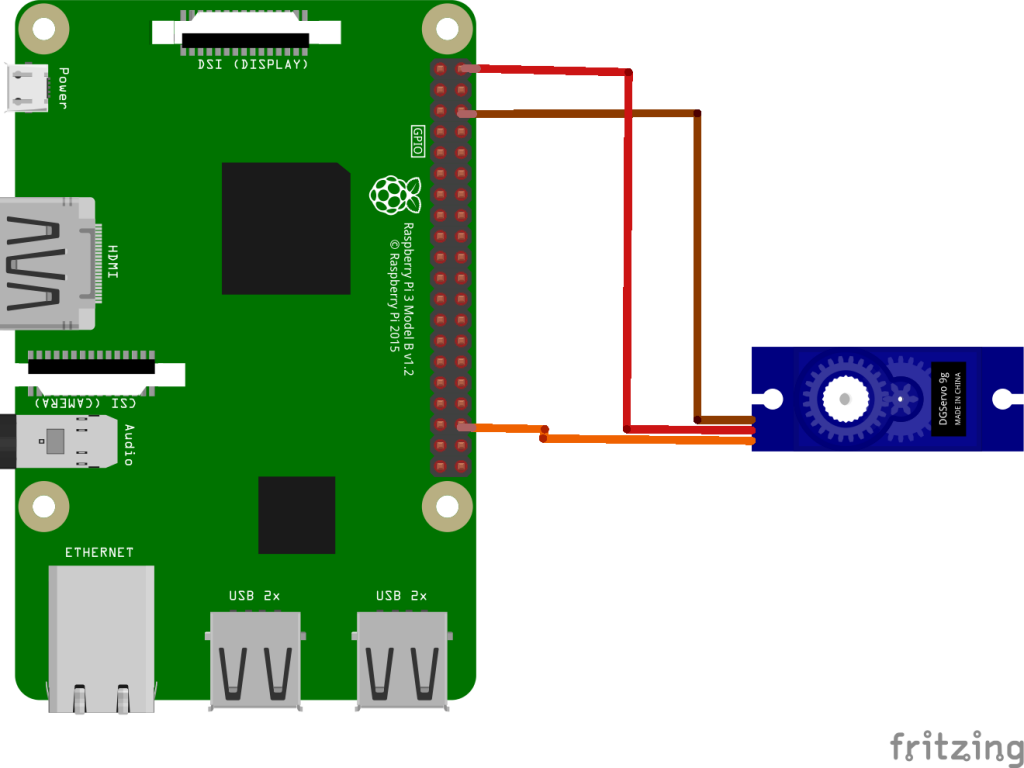
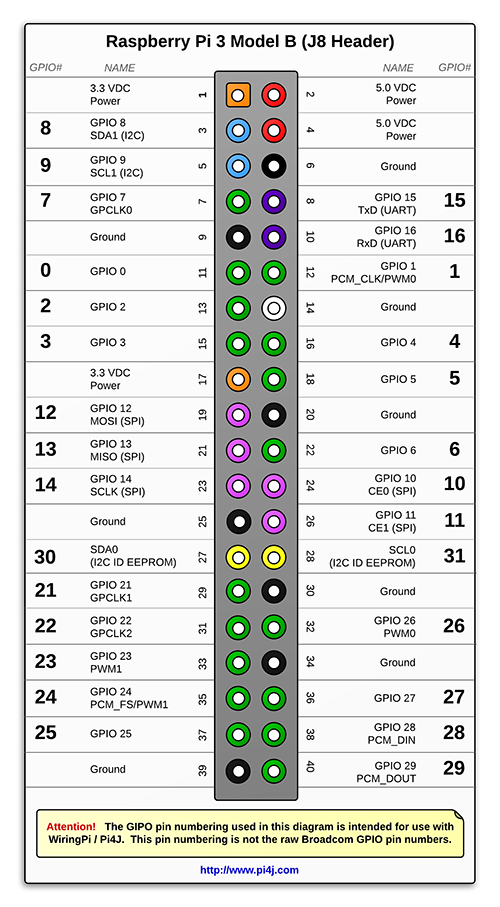
In my case, the servo is controlled via GPIO 27. The Raspberry Pi supplies the power. For larger servos, an external power supply might need to be used.
The GPIOs are only valid in conjunction with pi4j and wirePi
Software
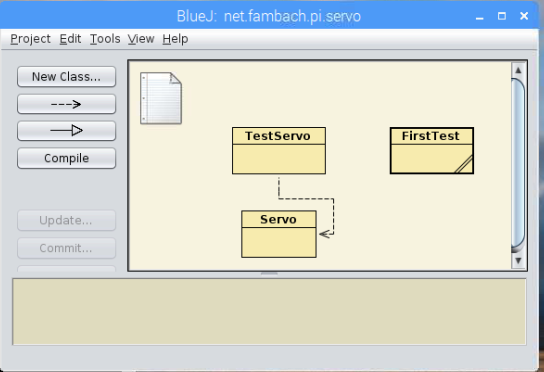
I am using BlueJ on the Pi itself as my development environment. I have created the following classes with it.
Code
Ein erster Test
Ein guter Anfang ist immer, den im Internet gefundenen Code in eine Main Funktion zu packen, um zu schauen, ob überhaupt was klappt. Dies habe ich in Form der FirstTest Klasse getan. Sie fährt alle Positionen des Servos ab. Die Funktionalität ist hier nicht gekapselt.
Hinweis: Der ursprüngliche Code (WP-Gistpen) ist verloren gegangen. Der folgende Code wurde im Oktober 2026 neu erstellt (kompiliert, aber nicht auf der Hardware getestet).
Source code FirstTest.java
import com.pi4j.wiringpi.Gpio;
import com.pi4j.wiringpi.SoftPwm;

/**
 * Erster Servo-Test mit Software-PWM: fährt alle Positionen ab.
 * Servo-Signal an GPIO 27 (pi4j / WiringPi-Nummerierung).
 * www.fambach.net, GPLv2
 */
public class FirstTest {

    private static final int PIN = 27;

    public static void main(String[] args) throws InterruptedException {
        Gpio.wiringPiSetup();

        // Takt 100 µs, Bereich 200 -> 20 ms Periode (50 Hz)
        SoftPwm.softPwmCreate(PIN, 0, 200);

        // 5 = 0,5 ms (Anschlag links) bis 25 = 2,5 ms (Anschlag rechts)
        for (int pos = 5; pos <= 25; pos++) {
            System.out.println("Position " + pos);
            SoftPwm.softPwmWrite(PIN, pos);
            Thread.sleep(500);
        }
        for (int pos = 25; pos >= 5; pos--) {
            System.out.println("Position " + pos);
            SoftPwm.softPwmWrite(PIN, pos);
            Thread.sleep(500);
        }

        SoftPwm.softPwmStop(PIN);
    }
}
Encapsulated code
Als nächsten Schritt habe ich den Code aus dem ersten Test genommen und ihn mit ein paar Änderungen in eine Klasse gepackt. Hierbei habe ich auch die Umrechnung von absoluten Werten in Grad implementiert. Für den Test der Klasse habe ich wiederum eine Main-Klasse erstellt, die alles mal aufruft.
Servo Class
Class for controlling the servo. The two most important methods are:
- setPos – Setzen der Position, Wertebereich von posMin bis posMax, wobei (posMax-posMin+1) die Mittelstellung ist.
- setDeg – Diese Methode projiziert die angegebene Gradzahl auf die möglichen Positionen (aktuell sehr ungenau 🙁 )
Source code Servo.java
import com.pi4j.wiringpi.Gpio;
import com.pi4j.wiringpi.SoftPwm;

/**
 * Steuert einen Servo über Software-PWM, wahlweise über die Position
 * oder über den Winkel relativ zur Mittelstellung.
 * www.fambach.net, GPLv2
 */
public class Servo {

    private final int pin;
    private final int posMin;
    private final int posMax;
    private final double degMax;

    /** Servo an GPIO 27, Positionen 5 bis 25 (0,5 ms bis 2,5 ms), ±90° */
    public Servo() {
        this(27, 5, 25, 90.0);
    }

    public Servo(int pin, int posMin, int posMax, double degMax) {
        this.pin = pin;
        this.posMin = posMin;
        this.posMax = posMax;
        this.degMax = degMax;
        Gpio.wiringPiSetup();
        SoftPwm.softPwmCreate(pin, 0, 200);
    }

    public int getPosMin() {
        return posMin;
    }

    public int getPosMax() {
        return posMax;
    }

    /** Mittelstellung des Servos */
    public int getPosCenter() {
        return (posMin + posMax) / 2;
    }

    /** Position setzen, Werte außerhalb von posMin..posMax werden begrenzt */
    public void setPos(int pos) {
        int limited = Math.max(posMin, Math.min(posMax, pos));
        SoftPwm.softPwmWrite(pin, limited);
    }

    /**
     * Winkel relativ zur Mittelstellung setzen (-degMax bis +degMax).
     * Wird auf die nächste mögliche Position gerundet, daher recht ungenau.
     */
    public void setDeg(double deg) {
        double stepsPerDeg = (posMax - posMin) / (2.0 * degMax);
        setPos((int) Math.round(getPosCenter() + deg * stepsPerDeg));
    }

    public void stop() {
        SoftPwm.softPwmStop(pin);
    }
}
Test Class
Klasse mit Main-Methode zum Testen der Servo-Klasse. In der Main-Methode werden alle Positionen abgefahren, wobei die Positionierung über den Winkel relativ zur 0 Position erfolgt.
Source code ServoTest.java
/**
 * Testet die Klasse Servo: fährt alle Winkel relativ zur Mittelstellung ab.
 * www.fambach.net, GPLv2
 */
public class ServoTest {

    public static void main(String[] args) throws InterruptedException {
        Servo servo = new Servo();

        servo.setDeg(0);
        Thread.sleep(1000);

        for (int deg = -90; deg <= 90; deg += 10) {
            System.out.println("Winkel " + deg + "°");
            servo.setDeg(deg);
            Thread.sleep(500);
        }

        servo.setDeg(0);
        Thread.sleep(1000);
        servo.stop();
    }
}
Tipps
Das Positionieren über die PI4j Lib ist sehr ungenau. Für die 180° Bewegungsspielraum des Servos stehen gerade mal rund 20 (+-2) Positionen zur Verfügung. Das sind rund 9° pro Position. Evtl. sollte man vorher testen, welche Positionen für den aktuellen Zweck am besten geeignet sind. Sollte der genaue Winkel wichtig sein, ist es besser, diesen vorab zu messen, als ihn über die setDeg Methode berechnen zu lassen.
Es gibt noch weitere Libs (Servoblast, … ), die evtl. genauer sind, man könnte auch überlegen, die Programmiersprache zu wechseln und dann den entsprechenden Code über das Nativ-Interface anzusprechen. Als nächster Versuch klingt Servoblast erst einmal vielversprechend.
Next steps
PWM in Thread
Ich habe versucht, den Software PWM innerhalb eines Threads laufen zu lassen, jedoch ohne Erfolg. Der Servo weigert sich zu funktionieren. Über die Ursache hierfür bin ich mir noch im Unklaren. Ich nehme allerdings an, dass hierdurch der Timer zerschossen wird.
ServoBlast
Nach diversen Tests mit unterschiedlichen Frequenzen habe ich mich entschlossen, ServoBlasterLink status: OK od. besser die PI Variante (PiBits) zu verwenden. Die Installation gestaltet sich einfach wie folgt.
Source code servoblaster-install.sh
# ServoBlaster (PiBits) herunterladen, bauen und installieren
sudo apt-get update
sudo apt-get install -y git build-essential
git clone https://github.com/richardghirst/PiBits.git
cd PiBits/ServoBlaster/user
make
sudo make install

# Test: Servo 5 auf 1,5 ms (Mittelstellung) stellen, Einheit 10 µs
echo 5=150 > /dev/servoblaster
Programming example
An dieser Stelle sollte nun eigentlich ein Code-Beispiel mit ServoBlast folgen. Da ich aktuell aber die Arbeiten am PI eingestellt habe und mit dem ESP8266 und ESP32 unterwegs bin, sei auf die folgenden Links verwiesen:
Troubleshooting
Exec funktioniert nicht
Wenn die exec Funktion von Java nix macht, ist hier ein guter Link zum Bugfixing.
http://www.javaworld.com/article/2071275/core-java/when-runtime-exec—won-t.htmlLink status: OK
Problems with println
Weiterhin könnte es helfen, nicht die println Methode zu verwenden, sondern die print, da zumindest mein PI den Abschluss der Zeile nicht richtig interpretieren konnte. print( „5=100\n“) hat jedoch funktioniert.
Related Posts
Sources
http://razzpisampler.oreilly.com/ch05.htmlLink status: Broken
https://github.com/Pi4J/pi4j/blob/master/pi4j-example/src/main/java/MaestroServoExample.javaLink status: Broken
https://phyks.me/2015/05/controlling-servomotors-on-a-raspberry-pi.htmlLink status: OK
https://github.com/richardghirst/PiBits/tree/master/ServoBlasterLink status: OK
http://rn-wissen.de/wiki/index.php/ServosLink status: Unknown
Attachment
Pin assignment
| Date | Change | Author |
|---|---|---|
| 10.10.2026 | Verlorenen Gistpen-Code durch neu erstellten Code (Code-Blöcke) ersetzt | Suffocation |
| 08.10.2026 | Überschriften-Hierarchie korrigiert (H1→H2, Unterebenen eine Stufe tiefer) | Suffocation |
| 04.10.2026 | Rechtschreibung korrigiert: Tippfehler, Kommas, Groß-/Kleinschreibung | Suffocation |
| 03.10.2026 | Log-Liste eingefügt | Suffocation |
| 11.06.2017 | Post created | Suffocation |
Considering the article is over a year old, I find it a bit of a shame that you still have to read „… to come“ in some places.
It also seems like something is missing from the „gistpen id“ lines, or I don't understand it.
Hello and thank you for your comment.
Yes, the age of the post is a bit of an issue. I started this on my last holiday and then didn't get around to finishing it, or I've been more involved with the ESP8266/ESP32 recently. Unfortunately, I haven't gotten around to a documented test with ServoBlast yet, maybe on the next holiday ;) . I've adjusted the post accordingly to inform readers about this. The two pages that describe the use of ServoBlast quite well from my perspective are now linked again.
The Gistpen ID thing is annoying. One version of Gistpen unfortunately didn’t work, which resulted in all source code pages no longer being displayed. For this reason, I unfortunately had to deactivate it and, as always, I didn't have time to revise the old pages. On new pages, I now offer a download. Long story short, I have reactivated Gistpen in the current version and it seems to be working again.
Greetings SFA