Last Updated on 18. October 2026 by SuffocationLink status: OK
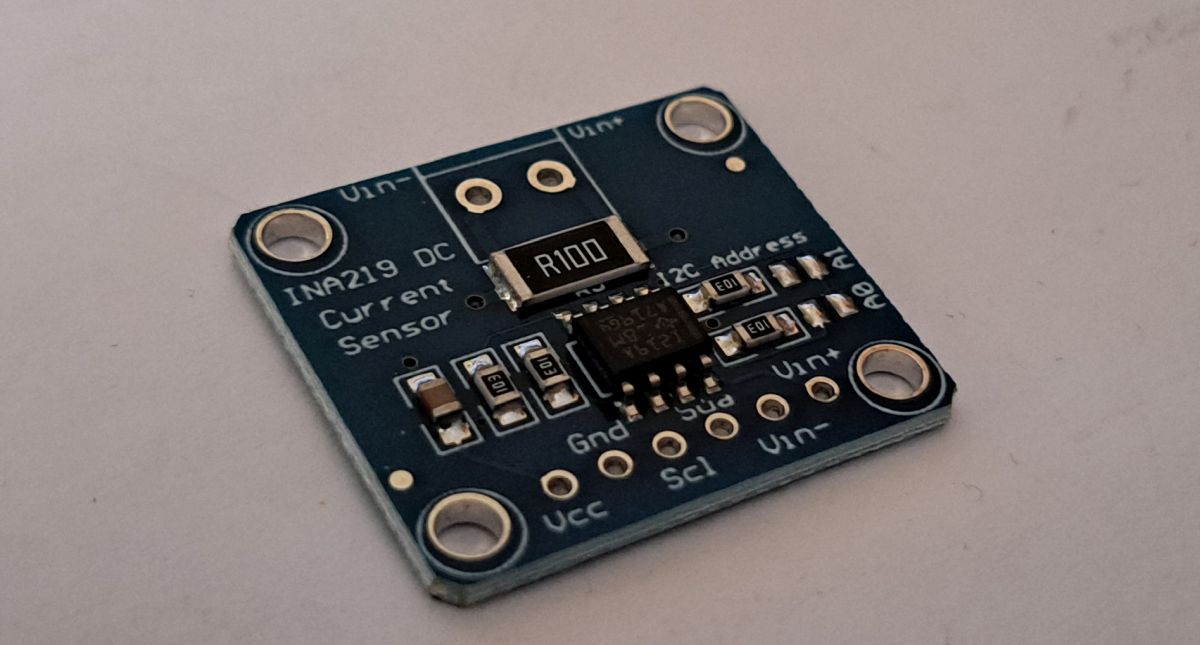
Der INA219 misst den Strom eines Verbrauchers und kann per I2C Bus ausgelesen werden. Ich habe diesen mal an einen ESP32 gehängt und versucht, ihm ein paar Daten zu entlocken.
Facts
| INA219 Strom-/Leistungssensor-Modul (I²C) | |
|---|---|
| Messgröße | Strom, Spannung, Leistung |
| Messprinzip | Spannungsabfall über Shunt-Widerstand 0,1 Ω (High-Side) |
| Sensor-Baustein | INA219A (Texas Instruments) |
| Messbereich | Strom ±3,2 A; Busspannung 0–26 V |
| Accuracy | ±1 % (INA219A, max. über −25 bis 85 °C; ±0,5 % max. bei 25 °C) |
| Operating voltage | 3–5 V |
| Stromaufnahme | max. 1 mA (Chip) |
| Schnittstellen | I²C, Adresse 0x40 (Auslieferung), per Lötbrücken A0/A1 auch 0x41, 0x44, 0x45 |
| Abmessungen | 25,2 × 22,2 mm |
| Description | 12-Bit-ADC, Auflösung 0,8 mA im Bereich ±3,2 A |
| A0 | A1 | Address |
|---|---|---|
| open | open | 0x40 (delivery state) |
| closed | open | 0x41 |
| open | closed | 0x44 |
| closed | closed | 0x45 |
Areas of application
- Measure power consumption
- Bestimmung der Restlaufzeit von Batterien
Views


Programming
Wiring
Spanish

Arduino

Libraries
Hier ein paar Links zu Bibliotheken:
https://github.com/adafruit/Adafruit_INA219Link status: OK
https://github.com/RobTillaart/INA219Link status: OK
https://github.com/wollewald/INA219_WELink status: OK
Ich habe für meine Tests die Adafruit Lib verwendet. Diese kann entweder über das Zip von Github oder über den Bibliothekar installiert werden.

Attention es gibt Abhängigkeiten, die mit installiert werden müssen:
- – Adafruit BusIO
- – Adafruit GFX Library
- – Adafruit NeoPixel
- – Adafruit SSD1306
Die GFX Lib kann ich mir noch vorstellen, bei den anderen wüsste ich nicht, welche Abhängigkeiten bestehen sollten, habe sie aber sicherheitshalber mal mit installiert.
Test programme
Mein Testprogramm ist auf Git zu finden, es entspricht im Großen und Ganzen dem Beispielprogramm.
https://github.com/sfambach/sensors/blob/master/INA219/src/INA219_ESP32_TEST/INA219_ESP32_TEST.inoLink status: OK
This is what it looks like:


Problems
I2C findet den Sensor nicht
Sometimes swap the data and time cables, or try with the I2C Test ProgramLink status: OK schauen, evtl. habt ihr ja eine andere Adresse. Achtet beim ESP darauf, welche Pins ihr verwendet habt.
Miscellaneous
Fritzing part
Conclusion
Leicht einzubindender Sensor, um Strom zu messen. Sein Vorteil ist die Kommunikation über I²C. Er wird nicht wie andere Sensoren über einen ADC am Microcontroller selbst abgefragt. Der Preis liegt so zwischen 3 und 4€ bei den Amazonen und noch billiger beim schnellen Ali. Auch können bis zu 4 Sensoren (Einstellung der Adresse beachten) parallel betrieben werden.
Related Posts
- Preview – INA3221 Power MonitorLink status: OK
- LM2596 Step Down Voltage ConverterLink status: OK
- Preview – Strommessung mit dem ACS712Link status: OK
Sources
Data sheetLink status: OK
https://wolles-elektronikkiste.de/ina219Link status: OK (Recommended, good description with example)
https://github.com/adafruit/Adafruit_INA219Link status: OK
https://github.com/RobTillaart/INA219Link status: OK
https://github.com/wollewald/INA219_WELink status: OK
| Date | Change | Author |
|---|---|---|
| 19.10.2026 | Fakten-Tabelle durch Datenblock aus dem Modell ersetzt | Suffocation |
| 08.10.2026 | Überschriften-Hierarchie korrigiert (H1→H2, Unterebenen eine Stufe tiefer) | Suffocation |
| 04.10.2026 | Rechtschreibung korrigiert: Tippfehler, Kommas, Groß-/Kleinschreibung, Grammatik | Suffocation |
| 03.10.2026 | Log-Liste eingefügt | Suffocation |
| 29.01.2024 | Post created | Suffocation |
Even a small load should under no circumstances be connected via the pin header. The trace widths here are quite thin and only reach the INA219 and then the load resistor, with a few milliohms of resistance in between. This results in excessively high readings (I ended up with a reading of around 20% too high).