Last Updated on 4 April 2024 by Suffocation
The ESP32 is the successor to the successful ESP8266 controller. It features a 32-bit Tensilica Xtensa LX6 CPU with typically two cores (RISC architecture). I'm collecting interesting information here for myself.
Areas of application
- Household applications
- Home automation
- Smart sockets and lighting control
- WLAN Control
- Baby monitor
- IP cameras
- Sensor networks
- Wearables
- Bluetooth applications such as headphones/speakers…
Documentation
https://www.espressif.com/en/products/hardware/esp32/overview
https://github.com/espressif/arduino-esp32
Hardware
Packaging
The ESP32 is available as a chip or as a module with additional external memory, antennas, etc.
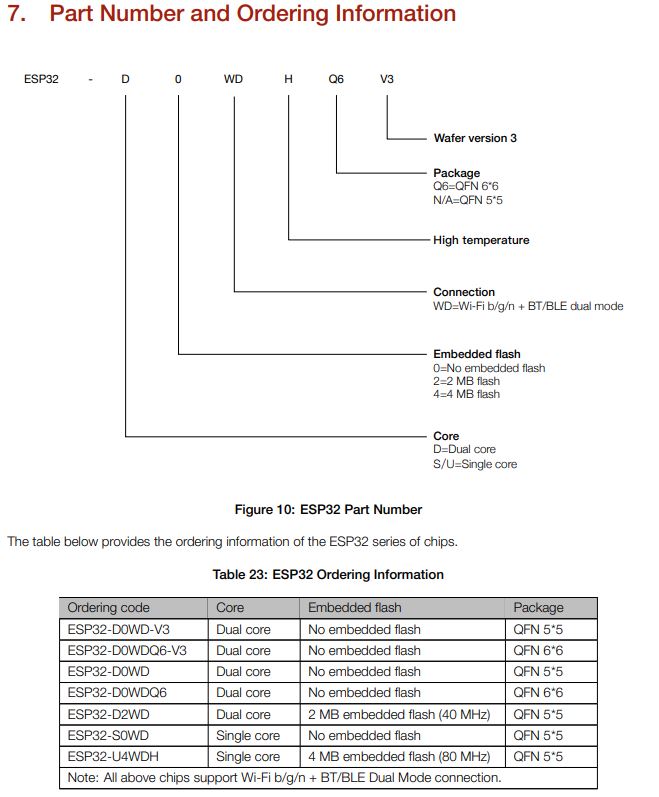
The current versions can be found in the Espressif ordering information. Here is the link to it:
Designation
Every ESP comes with a label. The individual chips are marked with a code. Here is an example:
Source: https://www.espressif.com/sites/default/files/documentation/esp32_datasheet_en.pdf
With the modules, the print is more of a reference to the respective data sheet or the Order information.
There are also different versions of the chips and modules, which can also differ from each other.
inner workings
The following diagram shows the architecture of the controller.
In addition to various interfaces, it has:
- Wi-Fi
- Bluetooth
- A temperature sensor
- Crypto Routines

Storage
The ESP comes with different memory configurations, here's a brief overview of which combinations are currently possible. The respective datasheet or the Order Information to be taken.
RAM
The original Esp32 has 520KB of internal memory, but also the ability to expand this externally. Currently, only PSRAM is supported for external expansion. It is possible to expand the memory up to 8MB, although currently only 4MB can be addressed simultaneously.
Flash
Depending on the configuration, the ESP comes in chip format with 0, 2, or 4 MB of internal FLASH. For modules, the FLASH can be externally fitted within the module. The original ESP can address a maximum of 16 MB of flash memory. Depending on how the flash memory is mapped and what type is used, different amounts of it can be managed.
- QSPI Flash
- When mapping as instruction memory, up to 11MB + 248KB can be addressed. Access becomes performant above 3MB + 248KB.
- When mapping as read-only data storage, a maximum of 4MB can be addressed.
- External SRAM can be mapped as CPU data memory and up to 8MB is supported. However, only 4MB can be accessed at the same time. (Example OTA 2x 4MB usable)
ROM
The UR-ESP has 448KB of ROM. According to the Espressif Forum, these include special internal functions and, for example, the Bluetooth stack. The externally usable functionality can be found on Git:
https://github.com/espressif/esp-idf/tree/master/components/esp32/include/rom
UART 1,2,3
The Esp32 has 3 UART interfaces, which can be configured independently of each other. The maximum speed is 5Mbps. This allows asynchronous communication with RS232, RS485 and IrDa support. Any GPIO pin can be used as a connection.. (Source: Espressif ESP32 datasheet Page 28, 31)
Default pin assignment:
| UART | RX IO | TX IO | CTS | RTS |
|---|---|---|---|---|
| UART0 | GPIO3 | GPIO1 | N/A | N/A |
| UART1 | GPIO9 | GPIO10 | GPIO6 | GPIO11 |
| UART2 | GPIO16 | GPIO17 | GPIO8 | GPIO7 |
In the Arduino GUI, the following settings are available:
- Serial – Uart0 GPIO 1/3
- Serial1 – Uart 1, GPIO 9/10 already mostly occupied by flash memory
- Serial2 – Uart 2 GPIO 16/17
The control is included in all common frameworks such as Arduino IDE, Espressif, Micropython….
I²C Wire Bus
The ESP32 has two Wire buses. Any GPIO pin can be chosen for the connection. It can operate at a speed of 100Kbit/s (Standard Mode), 400Kbit/s (Fast Mode), and up to 5MHz. Both buses support 7-bit and 10-bit addressing. (Source: Espressif ESP32 Datasheet Page 28,31)
The control is included in all common frameworks such as Arduino IDE, Espressif, Micropython….
ADC's
The ESP32 has two separate 12-bit ADC registers with a total of 18 channels. The 12-bit resolution results in a measurement range of 0 to 4095.
The ADC1 has 8 channels, which are available on GPIOs 32-39.
ADC2 has 10 channels and is connected to GPIOs 0, 2, 4, 12-15 and 25-27. Furthermore, the ADC2 cannot be used when Wi-Fi is in use.
| GPIO | ADC | Channel | Note |
|---|---|---|---|
| 36 | 1 | 0 | |
| 37 | 1 | 1 | |
| 38 | 1 | 2 | |
| 39 | 1 | 3 | |
| 32 | 1 | 4 | |
| 33 | 1 | 5 | |
| 34 | 1 | 6 | |
| 35 | 1 | 7 | |
| 4 | 2 | 0 | |
| 0 | 2 | 1 | Most often assigned to boot options |
| 2 | 2 | 2 | |
| 15 | 2 | 3 | |
| 13 | 2 | 4 | |
| 12 | 2 | 5 | |
| 14 | 2 | 6 | |
| 27 | 2 | 7 | |
| 25 | 2 | 8 | |
| 24 | 2 | 9 |
Further information can be found in the article linked below from Espressif.
Programming environment
Arduino GUI
Platformio
Espressif IDF
VS Code for Espressif IDF
Voltage at ESP query
The ESP8266 still has the option to measure the voltage. For the ESP32, an auxiliary circuit is required, a voltage divider with 100kOhm and 10kOhm on the ADC.
More info can be found in the linked post:
https://www.arduinoforum.de/arduino-Thread-ESP32-Batteriestatus
Formel zur Spannungsberechnung
Uin = (100 + 10) / 10 ((R1 + R2) /R2)
https://www.arduinoforum.de/arduino-Thread-ESP32-Batteriestatus
Software Tips
Read hardware data
The esp.h file/ESP class provides access to some hardware information. Such as ID, versions, free memory, etc. The complete range of functions can be viewed on GitHub.
https://github.com/espressif/arduino-esp32/blob/master/cores/esp32/Esp.h
The Esp.h usually doesn't need to be included as it's already part of the standard libraries. (Thanks for the tip to Andreas, see comment). Here are a few examples from the file.
Trigger restart
One function is to restart the ESP. This may be necessary after a remote firmware update or with sloppy programming when memory is full ;).
ESP.restart();Query storage information
Memory information is particularly useful for debugging. For example, it can be used to detect whether used memory is also being released. The following can be called for this purpose:
Heap/SPI memory size
uint32_t var = ESP.getHeapSize();
uint32_t var2 = ESP.getPsramSize();
Free Heap/PS Memory
uint32_t var1 = ESP.getFreeHeap();
uint32_t var2 = ESP.getFreePsram();
Minimum Heap/SPI memory since controller start.
uint32_t var1 = ESP.getMinFreeHeap();
uint32_t var2 = ESP.getMinFreePsram();
Maximum block size of the heap/SPI memory
uint32_t var1 = ESP.getMaxAllocHeap();
uint32_t var2 = ESP.getMaxAllocPsram();
Basic OTA
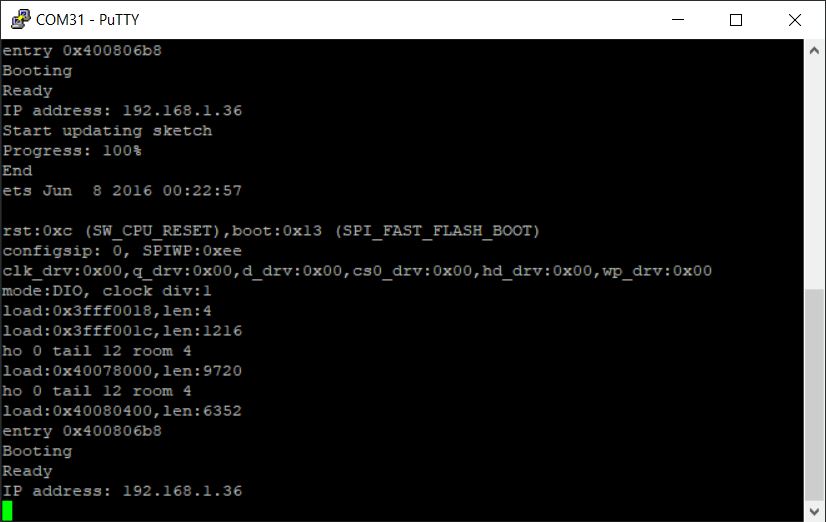
OTA – Over The Air – protocols enable microcontrollers to be flashed over the network. Since the ESP32 has Wi-Fi, flashing over the network is possible. The detailed guide can be found via the following link:
Basically, the procedure is as follows:
- Install Python
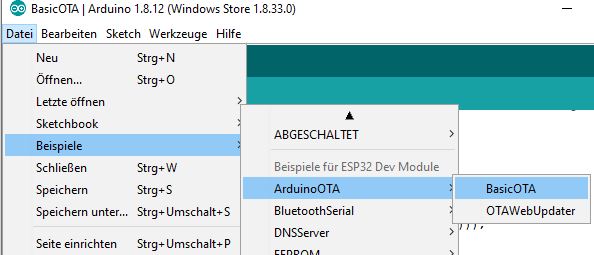
- Select Example Project Basic OTA
- Enter Wi-Fi data
- Flash OTA firmware
- Integrate OTA into your own code and always flash over the network
Problems
WiFi only connects every 2nd time.
To start the connection as follows:
  WiFi.disconnect();
  WiFi.mode(WIFI_STA); // can also be another mode
  while (WiFi.status() != WL_CONNECTED) {
    WiFi.begin(SSID, PASSWORD);
    delay(1000);
  }
Storage Full / too small
This is especially the case with graphics or the Bluetooth library, where you quickly hit the limits of the available program memory.
There's a good introductory video from Andreas Spiess:
YouTube Andreas Spiess – More Memory for the ESP32…
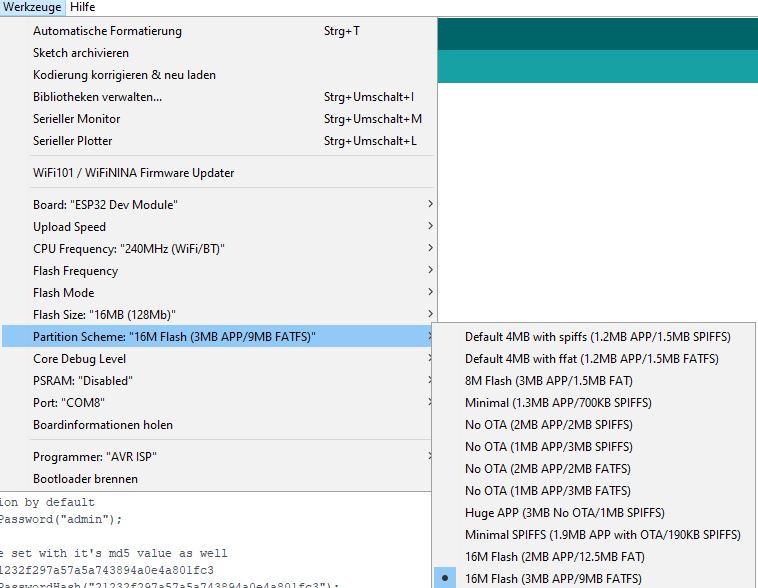
Essentially, it's about setting the memory allocation correctly. To get more memory for the applications, OTA can be switched off or SPIFFS memory can be reduced.
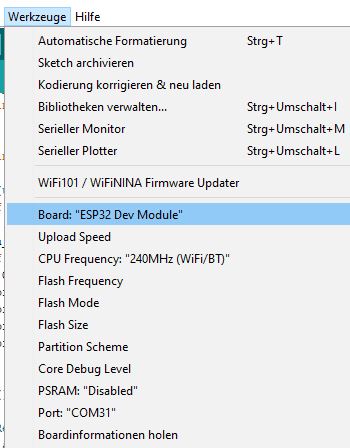
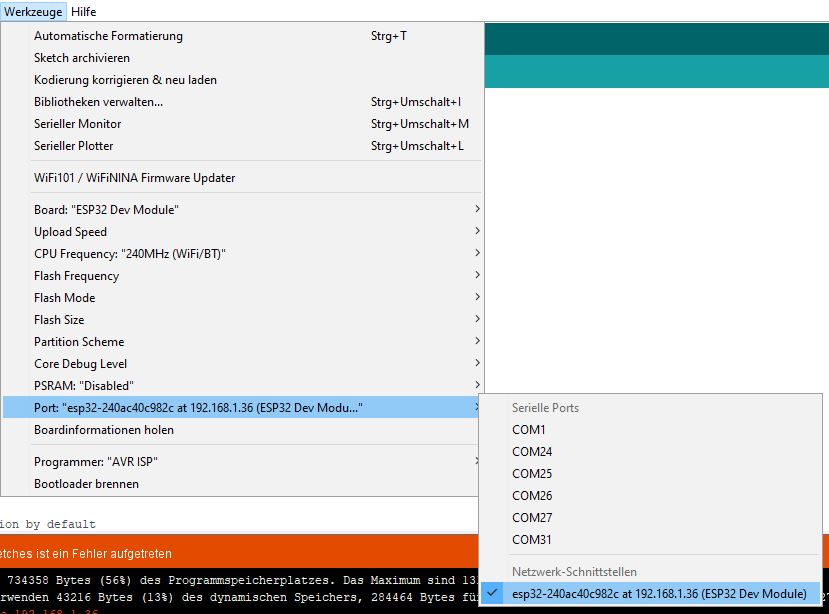
Arduino GUI
In the Arduino GUI, the settings can be found in the Tools menu.
Anyone needing additional options can add them in the XML configuration.
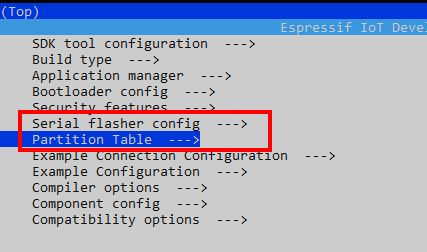
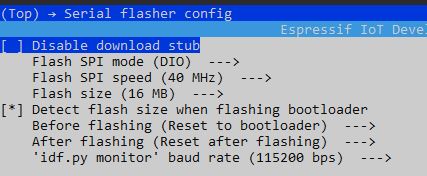
Espressif-IDF
In the Espressif IoT Development Framework (ESP-IDF), settings can be configured via Menuconfig and also through a custom partition table.


Related Posts
Sources
https://en.wikipedia.org/wiki/ESP32
https://www.espressif.com/en/products/hardware/esp32/overview
https://github.com/espressif/arduino-esp32
Espressif's Contribution to the ADC
YouTube Andreas Spiess – More Memory for the ESP32…
ThingPulse's contribution to PSRam
https://www.espressif.com/sites/default/files/documentation/esp32_datasheet_en.pdf
Please review, that doesn't make much sense.
QSPI Flash
When mapping as instruction memory, up to 11MB + 248KB can be addressed. With more than 3MB + 248KB, access becomes ineffectual.
Kind regards, Mike
Hello Mike
is from the ESP32 datasheet:
https://www.espressif.com/sites/default/files/documentation/esp32_datasheet_en.pdf
Page 26, if I understood something incorrectly, please correct me.
3.1.3 External Flash and RAM ESP32 supports multiple external QSPI flash and external RAM (SRAM) chips.
More details can be found in ESP32 Technical Reference Manual > Chapter SPI Controller. ESP32 also supports hardware
Encryption/decryption based on AES to protect developers’ programs and data in flash.
The ESP32 can access external QSPI flash and SRAM through high-speed caches.
• Up to 16 MB of external flash can be mapped into CPU instruction memory space and read-only memory
space simultaneously.
– When external flash is mapped into CPU instruction memory space, up to 11 MB + 248 KB can be
mapped at a time. Note that if more than 3 MB + 248 KB are mapped, cache performance will be
reduced due to speculative reads by the CPU.
– When external flash is mapped into read-only data memory space, up to 4 MB can be mapped at a
Time. 8-bit, 16-bit and 32-bit reads are supported.
• External RAM can be mapped into the CPU's data memory space. SRAM up to 8 MB is supported, and up to 4
MB can be mapped at a time. 8-bit, 16-bit and 32-bit reads and writes are supported.
Shame on me, this source was missing from the post, I have now added it.
Hello
Stefan
Hello Stefan!
Thank you for the informative website. Perhaps you can help me?
I am using the ESP32 cam for an intercom system and am having the problem that the camera can no longer be accessed after a few days (http://http://192.168.X.X/captureThe problem is fixed via the reset button, but that isn't a solution. Is there an HTTP command that can trigger such a reset? Everything runs via IOBroker for me, which allows such commands to be sent via script at any time.
SG tom
Hi Tom,
Thank you for your contribution. As far as I know, there isn't a command via HTML that calls ESP.restart(). However, it should be possible to implement the command in the existing format within the ESP cam.
In the file app_httpd.cpp of the Cam Webserver, from approximately line 491 (If cascade), insert another If condition:
else if (!strcmp(variable, „reset“)) { ESP.restart();}
and then via HTTP with
http:///control?var=reset&val=1
call. Theoretically, it should work like this, although I haven't tried it 😉
More on the ESP Cam here: https://www.fambach.net/esp32-cam-modul/your-ip
Hello
Solder a 220–470µF electrolytic capacitor to the 3.3V and GND.
The 3.3V often drops.
Hi Joe!
Thank you very much for the tip. When I have to remove the camera again, I'll solder the electrolytic capacitor on. At the moment, I'm monitoring the camera's fixed IP. If it no longer appears on the network, its power supply will be interrupted for 10 seconds. In that case, this is the simplest and quickest solution.
Hello Stefan
Thank you for the interesting tips.
First, I included Esp.h in the library and started the sketch with #include #.
The various hardware details could be displayed.
When I commented out the include, the display still appeared. How can I explain this to myself?
2. Question: You've displayed the instruction „ESP.restart()“ so prominently; it works but I can't think of a practical application for it. When would you need this?
Andreas
Hello Andreas,
Thank you for your comment. Esp.h is included by default with the board drivers and does not need to be included separately. I only listed it so that the functionalities it offers can be found in Git.
To be honest, I have to confess that I opened the page with the intention of gathering several useful pieces of information here, but unfortunately, that's all it amounted to :(. This is also because new boards are constantly being released that I want to test.
What I find important is the function for example for:
Greetings Stefan
P.S. I've expanded the post regarding this.
Hello Stefan, thank you for your carefully crafted and informative blog.
First, a quick note on a typo ;-).
Software Tips.
Then I was disappointed that you haven't yet got to grips with something better than the Arduino IDE. For me, as a long-standing (> 40 years) electronics and software developer, this IDE is just horrific.
Attempting to integrate the Arduino environment into more professional tools has previously been associated with some hurdles and wasn't really successful.
Have you looked into the new Eclipse 2019 yet? Dealing with multiple projects here has its pitfalls.
Kind regards, Manfred
Hello Manfred,
Thanks for your comment and the tip ;)(I've changed it).
It's true, the Arduino IDE is really only for simple applications. However, since I only dabble with it sporadically, it's sufficient for now. Its advantage is that it still works after updates. I tried Sloeber for Eclipse; the plugin is actually brilliant, but it repeatedly caused me problems with library resolution. For a while, I also worked with PlatformIO; this IDE is also quite decent, until it stopped working after updates. I haven't tried Eclipse 2019 yet, which would probably be something for my next holiday 🙂
Hello
Stefan