Last Updated on 4 April 2024 by Suffocation
Der ESP32 ist der Nachfolger des erfolgreichen ESP8266 Controllers. Er besitzt eine 32Bit Tensilica Xtensa LX6 CPU in der Regel mit zwei Kernen (RISC Architektur). Hier sammle ich für mich interessante Informationen.
Areas of application
- Household applications
- Home automation
- Smart sockets and lighting control
- WLAN Control
- Baby monitor
- IP cameras
- Sensor networks
- Wearables
- Bloototh Applikationen wie Kopfhörer/Lautsprecher …
Documentation
https://www.espressif.com/en/products/hardware/esp32/overview
https://github.com/espressif/arduino-esp32
Hardware
Packaging
Den ESP32 gibt es als Chip oder Modul mit zusätzlichen externen Speicher, Antennen u.ä.
The current versions can be found in the Espressif ordering information. Here is the link to it:
Designation
Every ESP comes with a label. The individual chips are marked with a code. Here is an example:
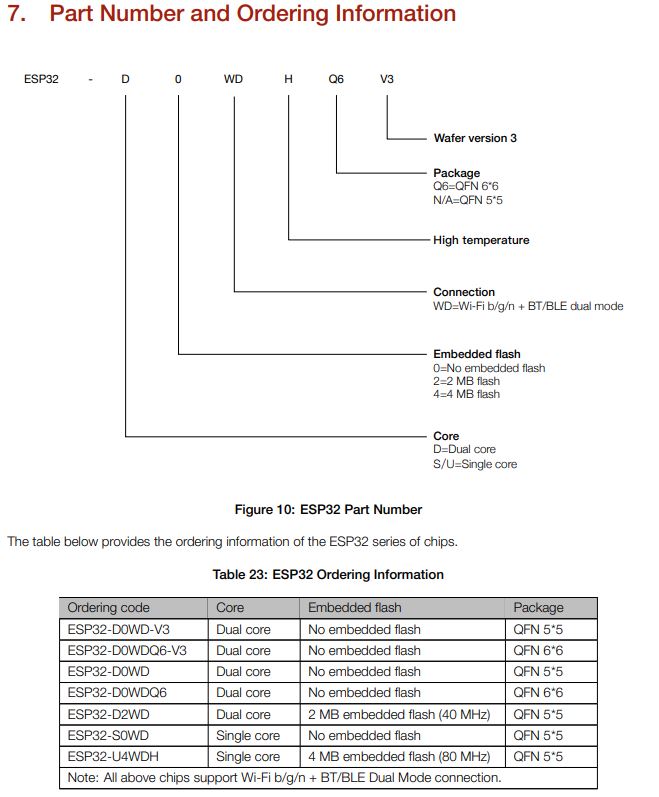
Source: https://www.espressif.com/sites/default/files/documentation/esp32_datasheet_en.pdf
With the modules, the print is more of a reference to the respective data sheet or the Order information.
Auch gibt es die Chips und Module in unterschiedlichen Versionen, die sich zusätzlich voneinander unterscheiden können.
inner workings
The following diagram shows the architecture of the controller.
In addition to various interfaces, it has:
- Wi-Fi
- Bluetooth
- A temperature sensor
- Crypto Routines

Storage
Der ESP kommt mit unterschiedlichen Speicher Konfigurationen daher, hier ein kurzer Überblick welche Kombinationen aktuell möglich sind. Um welche Konfiguration es sich handelt kann dem jeweiligen Datenblatt oder der Order Information to be taken.
RAM
Der Ur-Esp32 hat ein 520KB internen Speicher aber auch die Möglichkeit diesen extern zu erweitern. Aktuell wird als externe Erweiterung nur PSRAM unterstützt. Es ist möglich den Speicher auf bis zu 8MB zu erweitern wobei aktuell nur 4 MB gleichzeitig adressiert werden können.
Flash
Depending on the configuration, the ESP comes in chip format with 0, 2, or 4 MB of internal FLASH. For modules, the FLASH can be externally fitted within the module. The original ESP can address a maximum of 16 MB of flash memory. Depending on how the flash memory is mapped and what type is used, different amounts of it can be managed.
- QSPI Flash
- Beim Mapping als Instuctions Speicher, können bis zu 11MB + 248KB adressiert werden. Bei mehr als 3 MB + 248 KB wird der Zugriff inperformant.
- Beim Mapping als exklusiv lesen Datenspeicher können maximal 4MB adressiert werden.
- Externer SRam can als CPU Datenspeicher gemappt weden und es werden bis zu 8MB unterstützt. Es können aber nur auf 4MB gleichzeitig zugegriffen werden. (Beispiel OTA 2x 4MB Nutzbar)
ROM
The UR-ESP has 448KB of ROM. According to the Espressif Forum, these include special internal functions and, for example, the Bluetooth stack. The externally usable functionality can be found on Git:
https://github.com/espressif/esp-idf/tree/master/components/esp32/include/rom
UART 1,2,3
Der Esp32 besitzt 3 UART Schnittstellen, die von einander unabhängig konfiguriert werden können. Die Maximalgeschwindigkeit beträgt 5Mbps Dies ermöglicht eine asysnchrone Kommunikation mit RS232, RS485 und IrDa unterstützung. Any GPIO pin can be used as a connection.. (Source: Espressif ESP32 datasheet Page 28, 31)
Default pin assignment:
| UART | RX IO | TX IO | CTS | RTS |
|---|---|---|---|---|
| UART0 | GPIO3 | GPIO1 | N/A | N/A |
| UART1 | GPIO9 | GPIO10 | GPIO6 | GPIO11 |
| UART2 | GPIO16 | GPIO17 | GPIO8 | GPIO7 |
In the Arduino GUI, the following settings are available:
- Serial – Uart0 GPIO 1/3
- Serial1 – Uart 1, GPIO 9/10 already mostly occupied by flash memory
- Serial2 – Uart 2 GPIO 16/17
Die Ansteuerung ist in allen gängigen Frameworks wie Arduino IDE, Espressif, Micropython… enthalten.
I²C Wire Bus
The ESP32 has two Wire buses. Für den Anschluss kann jeder GPIO Pin gewählt werden. It can operate at a speed of 100Kbit/s (Standard Mode), 400Kbit/s (Fast Mode), and up to 5MHz. Both buses support 7-bit and 10-bit addressing. (Source: Espressif ESP32 Datasheet Page 28,31)
Die Ansteuerung ist in allen gängigen Frameworks wie Arduino IDE, Espressif, Micropython… enthalten.
ADC's
Der ESP32 besitzt zwei getrennt ADC 12Bit Register mit insgesamt 18 Kanälen. Durch die 12 Bit ergibt sich eine Messspanne von 0 bis 4095.
ADC1 hat 8 Kanäle, diese sind an den GPIOs 32-39 Verfügbar.
ADC2 besitzt 10 Kanäle und ist mit den GPIOs 0, 2, 4, 12 – 15 und 25 – 27 verbunden. Weiterhin ist der ADC2 cannot be used when Wi-Fi is in use.
| GPIO | ADC | Channel | Note |
|---|---|---|---|
| 36 | 1 | 0 | |
| 37 | 1 | 1 | |
| 38 | 1 | 2 | |
| 39 | 1 | 3 | |
| 32 | 1 | 4 | |
| 33 | 1 | 5 | |
| 34 | 1 | 6 | |
| 35 | 1 | 7 | |
| 4 | 2 | 0 | |
| 0 | 2 | 1 | Most often assigned to boot options |
| 2 | 2 | 2 | |
| 15 | 2 | 3 | |
| 13 | 2 | 4 | |
| 12 | 2 | 5 | |
| 14 | 2 | 6 | |
| 27 | 2 | 7 | |
| 25 | 2 | 8 | |
| 24 | 2 | 9 |
Further information can be found in the article linked below from Espressif.
Programming environment
Arduino GUI
Setting up ESP32 with the Arduino GUI
Platformio
Platform IO
Espressif IDF
Install Espressif IDF for ESP32-S2
VS-Code für Espressif IDF
VS-Code Espressif IDF
Voltage at ESP query
Der ESP 8266 hat noch die Möglichkeit die Spannung zu messen. Beim ESP32 beötigt man eine Hilfsschaltung, ein Spannungsteiler mit 100kOhm und 10kOhm am ADC.
More info can be found in the linked post:
https://www.arduinoforum.de/arduino-Thread-ESP32-Batteriestatus
Formel zur Spannungsberechnung
Uin = (100 + 10) / 10 ((R1 + R2) /R2)
https://www.arduinoforum.de/arduino-Thread-ESP32-Batteriestatus
Software Tips
Read hardware data
The esp.h file/ESP class provides access to some hardware information. Such as ID, versions, free memory, etc. The complete range of functions can be viewed on GitHub.
https://github.com/espressif/arduino-esp32/blob/master/cores/esp32/Esp.h
Eingebunden werden muss die Esp.h meist nicht diese ist bei den Standardbibliotheken mit dabei. (Danke für den Hinweis an Andreas, siehe Kommentar) . Folgend ein paar Beispiele aus der Datei.
Neustart auslösen
Eine Funktion ist das Neustarten des ESPs. Dies kann nach einem remote Update der Firmware nötig sein oder bei schlampiger Programmierung wenn der Speicher voll ist ;).
ESP.restart();Query storage information
Gerade für das Debuggen sind Speicherinfomationen ganz nützlich. Zum Beispiel kann hieran erkannt werden, ob verwendeter Speicher auch wieder frei gegeben wird. Die folgenden können hierfür aufgerufen werden:
Heap/SPI Speicher Größe
uint32_t var = ESP.getHeapSize();
uint32_t var2 = ESP.getPsramSize();
Free Heap/PS Memory
uint32_t var1 = ESP.getFreeHeap();
uint32_t var2 = ESP.getFreePsram();
Minimum Heap/SPI memory since controller start.
uint32_t var1 = ESP.getMinFreeHeap();
uint32_t var2 = ESP.getMinFreePsram();
Maximale Blockgröße des Heap/SPI Speichers
uint32_t var1 = ESP.getMaxAllocHeap();
uint32_t var2 = ESP.getMaxAllocPsram();
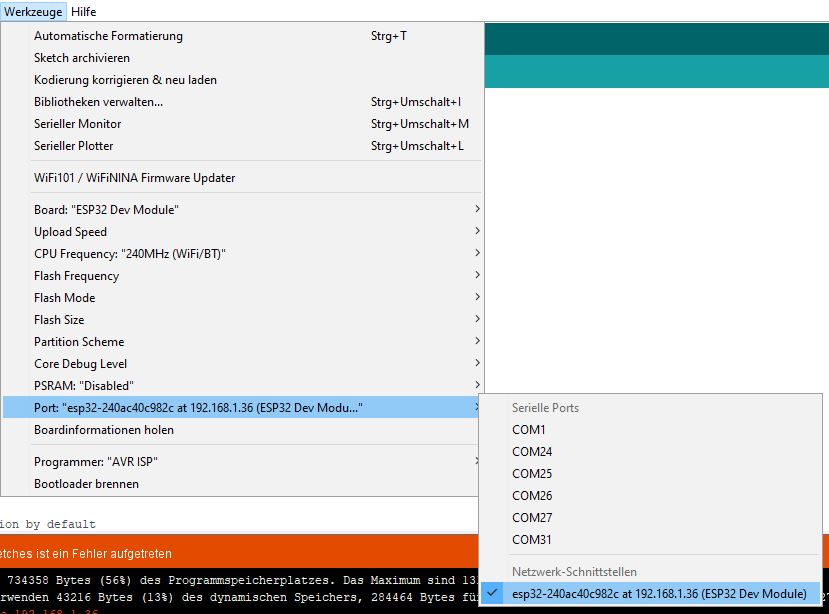
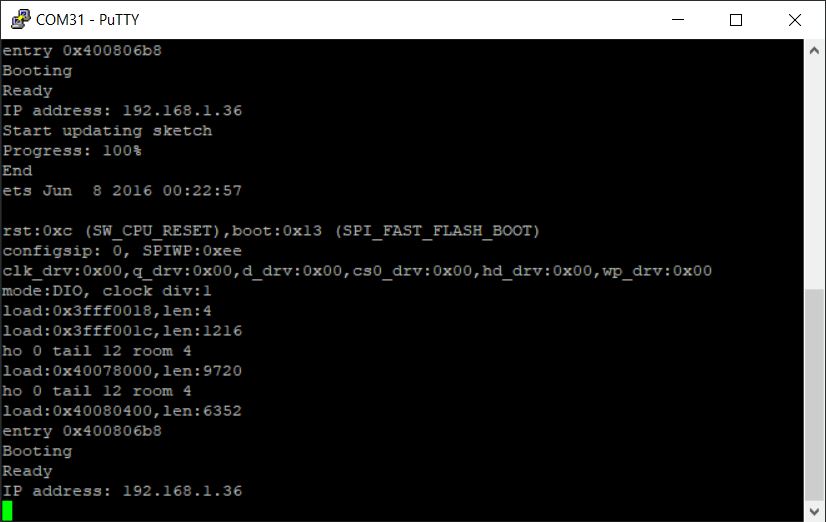
Basic OTA
OTA – Over The Air – Protokolle ermöglichen es Microcontroller über das Netzwerk zu flashen. Da der ESP32 über WLAN verfügt ist ein flashen über das Netz möglich. Die ausführliche Anleitung kann unter folgenden Link gefunden werden:
Basically, the procedure is as follows:
- Install Python
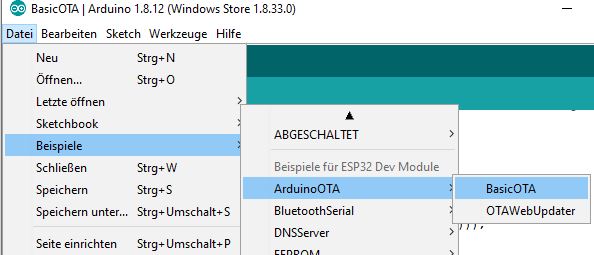
- Beispiel Project Basic OTA auswählen
- Enter Wi-Fi data
- Flash OTA firmware
- OTA teil in eigenen Code einbauen und immer über das Netzwerk flashen
Problems
WiFi only connects every 2nd time.
To start the connection as follows:
  WiFi.disconnect();
  WiFi.mode(WIFI_STA); // can also be another mode
  while (WiFi.status() != WL_CONNECTED) {
    WiFi.begin(SSID, PASSWORD);
    delay(1000);
  }
Storage Full / too small
Gerade bei Graphiken oder bei der Bluetooth Biliothek gerät man schnell mal an die Grenzen des verfügbaren Programmspeichers.
Ein gutes Einführungvideo gibts von Andreas Spiess:
YouTube Andreas Spiess – More Memory for the ESP32…
Im Grunde geht es darum die Speicherzuordnung richtig einzustellen. Um mehr Speicher für die Applikationen zu bekommen, kann OTA ausgeschaltet oder der SPIFFS Speicher vermindert werden.
Arduino GUI
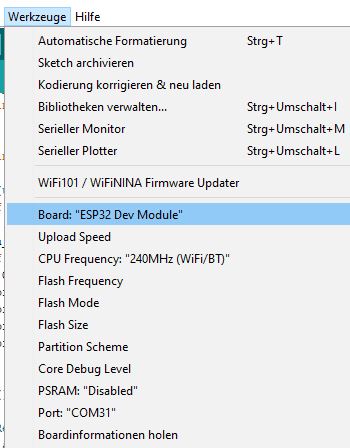
In der Arduino Gui sind die einstellungen im Menü Werkzeuge zu finden.
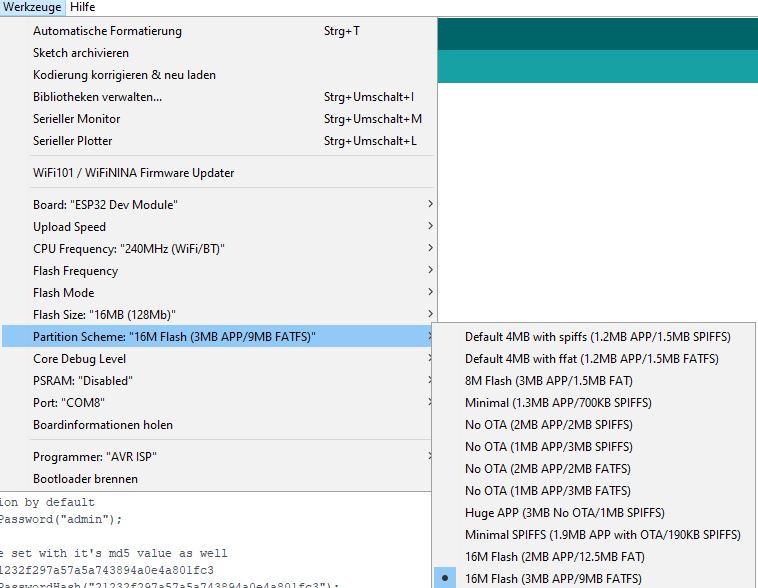
Wer zusätzliche Optionen braucht, kann diese in der Konfiguration XML hinzufügen.
Espressif-IDF
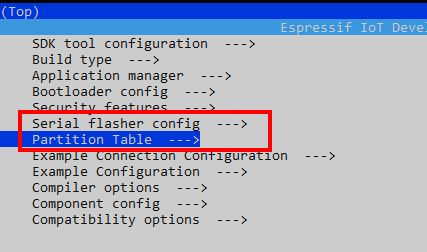
In der Espressiv-IDF können die Einstellungen über die Menuconfig und über eine eigene Partitionstabelle vorgenommen werden.


Verwandte Beiträge
Sources
https://en.wikipedia.org/wiki/ESP32
https://www.espressif.com/en/products/hardware/esp32/overview
https://github.com/espressif/arduino-esp32
Espressif's Contribution to the ADC
YouTube Andreas Spiess – More Memory for the ESP32…
ThingPulse's contribution to PSRam
https://www.espressif.com/sites/default/files/documentation/esp32_datasheet_en.pdf
| Date | Change | Author |
|---|---|---|
| 19.06.2018 | Post created | Suffocation |
Please review, that doesn't make much sense.
QSPI Flash
When mapping as instruction memory, up to 11MB + 248KB can be addressed. With more than 3MB + 248KB, access becomes ineffectual.
Kind regards, Mike
Hello Mike
is from the ESP32 datasheet:
https://www.espressif.com/sites/default/files/documentation/esp32_datasheet_en.pdf
Page 26, if I understood something incorrectly, please correct me.
3.1.3 External Flash and RAM ESP32 supports multiple external QSPI flash and external RAM (SRAM) chips.
More details can be found in ESP32 Technical Reference Manual > Chapter SPI Controller. ESP32 also supports hardware
Encryption/decryption based on AES to protect developers’ programs and data in flash.
The ESP32 can access external QSPI flash and SRAM through high-speed caches.
• Up to 16 MB of external flash can be mapped into CPU instruction memory space and read-only memory
space simultaneously.
– When external flash is mapped into CPU instruction memory space, up to 11 MB + 248 KB can be
mapped at a time. Note that if more than 3 MB + 248 KB are mapped, cache performance will be
reduced due to speculative reads by the CPU.
– When external flash is mapped into read-only data memory space, up to 4 MB can be mapped at a
Time. 8-bit, 16-bit and 32-bit reads are supported.
• External RAM can be mapped into the CPU's data memory space. SRAM up to 8 MB is supported, and up to 4
MB can be mapped at a time. 8-bit, 16-bit and 32-bit reads and writes are supported.
Shame on me, this source was missing from the post, I have now added it.
Hello
Stefan
Hello Stefan!
Thank you for the informative website. Perhaps you can help me?
I am using the ESP32 cam for an intercom system and am having the problem that the camera can no longer be accessed after a few days (http://http://192.168.X.X/captureThe problem is fixed via the reset button, but that isn't a solution. Is there an HTTP command that can trigger such a reset? Everything runs via IOBroker for me, which allows such commands to be sent via script at any time.
SG tom
Hi Tom,
Thank you for your contribution. As far as I know, there isn't a command via HTML that calls ESP.restart(). However, it should be possible to implement the command in the existing format within the ESP cam.
In the file app_httpd.cpp of the Cam Webserver, from approximately line 491 (If cascade), insert another If condition:
else if (!strcmp(variable, „reset“)) { ESP.restart();}
and then via HTTP with
http:///control?var=reset&val=1
call. Theoretically, it should work like this, although I haven't tried it 😉
More on the ESP Cam here: https://www.fambach.net/esp32-cam-modul/your-ip
Hello
Solder a 220–470µF electrolytic capacitor to the 3.3V and GND.
The 3.3V often drops.
Hi Joe!
Thank you very much for the tip. When I have to remove the camera again, I'll solder the electrolytic capacitor on. At the moment, I'm monitoring the camera's fixed IP. If it no longer appears on the network, its power supply will be interrupted for 10 seconds. In that case, this is the simplest and quickest solution.
Hello Stefan
Thank you for the interesting tips.
First, I included Esp.h in the library and started the sketch with #include #.
The various hardware details could be displayed.
When I commented out the include, the display still appeared. How can I explain this to myself?
2. Question: You've displayed the instruction „ESP.restart()“ so prominently; it works but I can't think of a practical application for it. When would you need this?
Andreas
Hello Andreas,
Thank you for your comment. Esp.h is included by default with the board drivers and does not need to be included separately. I only listed it so that the functionalities it offers can be found in Git.
To be honest, I have to confess that I opened the page with the intention of gathering several useful pieces of information here, but unfortunately, that's all it amounted to :(. This is also because new boards are constantly being released that I want to test.
What I find important is the function for example for:
Greetings Stefan
P.S. I've expanded the post regarding this.
Hello Stefan, thank you for your carefully crafted and informative blog.
First, a quick note on a typo ;-).
Software Tips.
Then I was disappointed that you haven't yet got to grips with something better than the Arduino IDE. For me, as a long-standing (> 40 years) electronics and software developer, this IDE is just horrific.
Attempting to integrate the Arduino environment into more professional tools has previously been associated with some hurdles and wasn't really successful.
Have you looked into the new Eclipse 2019 yet? Dealing with multiple projects here has its pitfalls.
Kind regards, Manfred
Hello Manfred,
Thanks for your comment and the tip ;)(I've changed it).
It's true, the Arduino IDE is really only for simple applications. However, since I only dabble with it sporadically, it's sufficient for now. Its advantage is that it still works after updates. I tried Sloeber for Eclipse; the plugin is actually brilliant, but it repeatedly caused me problems with library resolution. For a while, I also worked with PlatformIO; this IDE is also quite decent, until it stopped working after updates. I haven't tried Eclipse 2019 yet, which would probably be something for my next holiday 🙂
Hello
Stefan