Last Updated on 15 April 2022 by Suffocation
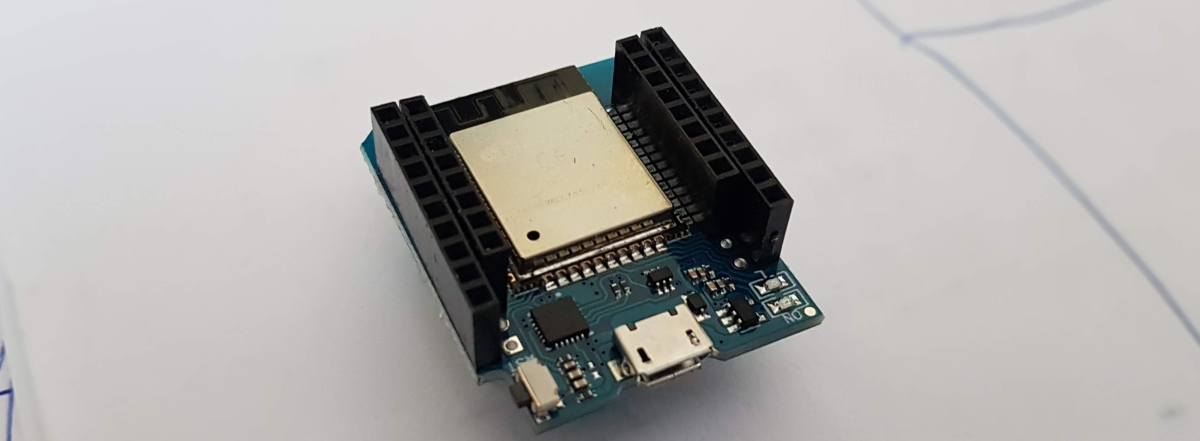
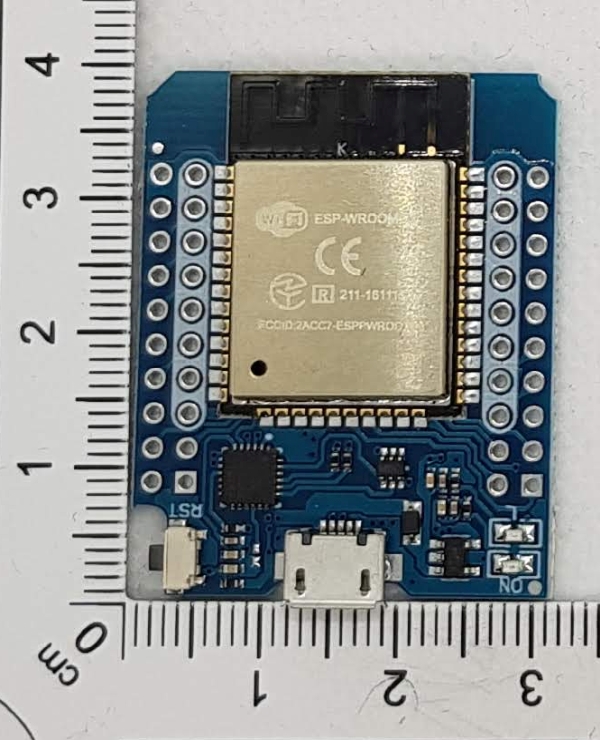
Der WEMOS D1 EP32 ist der Ersatz für den D1 Mini. Er hat ein aufgedampftes ESP 32 Wroom Modul. Ein USB Micro Anschluss, ein Reset-Taster und zwei Eingebaute LEDs auf dem ESP sind die einzige Peripherie. Er zählt von seinen Abmessungen eher zu den kleinen, dies beschränkt in diesem Falle aber nicht die Anzahl der nach aussen geführten 40 Pins, da diese in zwei Reihen nach aussen geführt sind.
Interesting, how with the Wemos D1 Mini there are so many expansion boardsSee manufacturer).
Ich habe bei Wemos keinen Hinweise über den D1 ESP32 gefunden, deshalb sei in Frage gestell ob dieser offizell auch von Wemos produziert wird.
Facts
- USB Micro Connector (CH9102)
- Reset button
- 18 Digital Pins
- 8 Analogue Pins (almost freely configurable)
- Operating voltage 3.3V
- Connection voltage 5V
- 4M SPI Flash Memory
- 80MHz/240MHz
- 2 LEDs
- Preis ~5€
- Dimensions in mm: l/w/h 39/32/13
Pin assignment
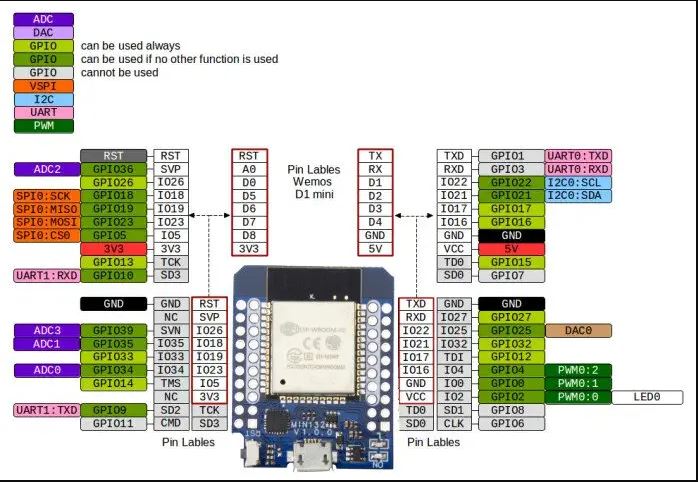
| Pin | Functions | ESP32 Pin |
|---|---|---|
| TX | UART TXD | TXD |
| RX | UART RXD | RXD |
| A0 | IO, ADC2 | GPIO36 |
| D0 | In | GPIO26 |
| D1 | In | GPIO22, I²C SCL |
| D2 | In | GPIO21, I²C SDA |
| D3 | In | GPIO17 |
| D4 | In | GPIO16 |
| D5 | In | GPIO18 |
| D6 | In | GPIO19 |
| D7 | In | GPIO23 |
| D8 | In | GPIO5 |
| G | Ground | Ground |
| 5V | 5V | – |
| 3V3 | 3.3V | 3.3V |
| RST | Reset | RST |
Source: https://www.wemos.cc/en/latest/d1/d1_mini.html
Areas of application
- Microcontroller projects with Wi-Fi
- Remote control
- Alarm clock
- ...
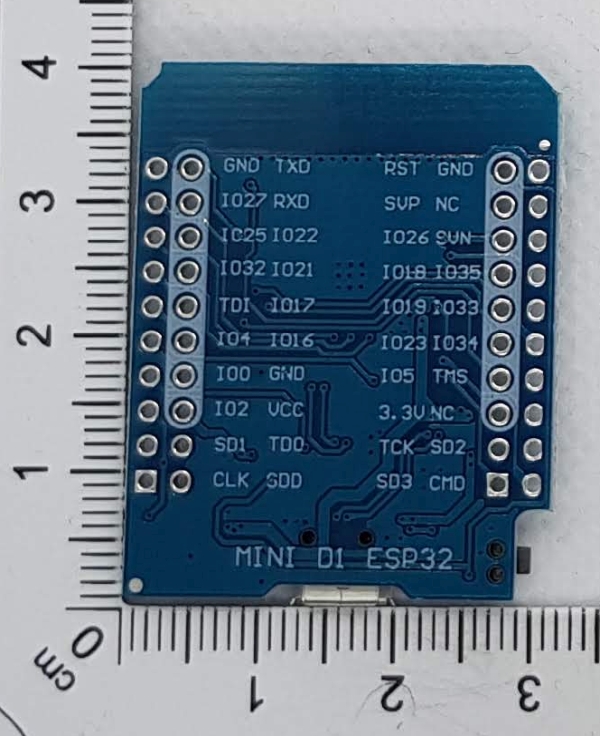
Views
Programming
Preparation
Der Wemos kommt mit einer CH9102 USB Schnitstelle, sollte der Treiber noch nicht installiert sein muß dieser nachinstalliert werden.
Libraries
Zur Programmierung des Wemos sind keine zusätlichen Bibliotheken nötig. Die ESP Erweiterung der Arduino GUI muss jedoch installiert sein. Siehe hierzu auch den Link for setup.
Current status Arduino ESP32 Library V2.0.2
Test programme
Als Testprogramm kann Blink verwendet werden. Dies gibt es entweder bei den Beispielprogrammen der Arduino GUI unter diesen findest sich auch das Task gesteurte Blink welches zum Erlernen der Multitaskumgebung auf dem ESP32 ganz nett ist. Dies kann auch über Github bezogen werden:
I was able to program my Wemos D1 ESP32 with the following settings:
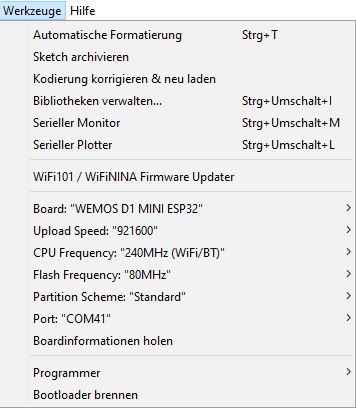
Als Port wählt bitte eure Serielle Schnittstelle aus, bei mir ist es COM 15.
Problems
D Ports not found
Unfortunately, the D-ports are not mapped. Here, it helps to simply create defines with the corresponding ports. Example:
#ifndef D7
#define D7 23
#endif

#ifndef D5
#define D5 18
#endif
Wemos board not recognised
CH9102 Install drivers
Should there be any further problems Zadig Try.
Programmierung schlägt fehl
Einstellungen für Board, Port und Programmer überprüfen. Evtl. auch mal andere als die von mir gezeigten ausprobieren. Es gibt auch Board Setting für den Wemos
Miscellaneous
Fritzing Wemos D1 ESP32 Mini:
https://forum.fritzing.org/uploads/short-url/wv8xVt6y4tFToPngAeMqUju2oUl.fzpz
Example projects:
https://github.com/wemos/D1_mini_Examples
Modell für den 3D Druck
https://grabcad.com/library/wemos-d1-mini-v3-0-0-1
https://grabcad.com/library/wemos-d1-mini-1
Conclusion
Der D1 ESP32 ist aus meiner Sicht nicht ganz kompatibel weil ich keine Board Beschreibung für die Arduino Gui finden konnte die auch das Mapping für die D-Ports beinhaltet. Dennoch kann dieser als schneller Ersetz dienen. Durch die zusätzlichen Pins ist er auch für andere Projekte gut geignet. Mit den Durchgeschliffenen Ports ist er auch auf einer Steckplatine betreibbar und insgesamt sehr kompakt.
Verwandte Beiträge
- D1 Mini Shield – Prototype PCB
- Preview – W600-Pico V1.0.0 1MB Flash
- D1 Mini Shield – RGB LED (Individual)
- D1 Mini Shield – RGB LED
- D1 Mini Shield – PIR (Motion Sensor)
- D1 Mini Shield – HR8833 Motor
- D1 Mini Shield – AT8870 Motor
- D1 Mini Shield – SG30 Air Quality Measurement
- D1 Mini Shield – I2C Connector
- Wemos C3 Mini
Sources
https://arduino-projekte.info/produkt/d1-mini-esp32-wifi-bluetooth/
https://makersportal.com/shop/esp32-d1-mini-bluetoothwifi-board
https://docs.platformio.org/en/stable/boards/espressif32/wemos_d1_mini32.html
| Date | Change | Author |
|---|---|---|
| 12.04.2022 | Post created | Suffocation |
Hi Sven,
If the problem with brownout exceptions still hasn't been solved – here's a tip: insert the following code on the first line in setup().
void setup() {
RTC_CNTL_BROWN_OUT_REG,0);
.........
Hi, I found the ESP32 in the D1-mini format in my bits and bobs box and wanted to tinker with something…
As soon as I try a WifiConnect with the Arduino API, I get a brownout exception and restart. The board is connected to the computer via USB (tested with different cables and USB ports). Always the same rubbish.
Unlike other dev boards, at least the 5V voltage is available on an external pin which can be supplied with an external voltage source. Usually, for many ESP32 projects (with Wi-Fi), it is recommended to stabilise the external voltage with a hefty capacitor between +5V and GND. How should one do this with this board?
As Stefan wrote, mapping the pinouts to the Arduino code is fiddly reverse-engineering.
I would use a different board next time.
Hi Sven,
I'm currently detoxing from technology 😉, so here's just a quick message. I would have initially guessed voltage too (VCC pin). But it could also be down to the settings in the Arduino GUI, memory (size, type...).
Hello
Stefan