Last Updated on 15. October 2026 by SuffocationLink status: OK
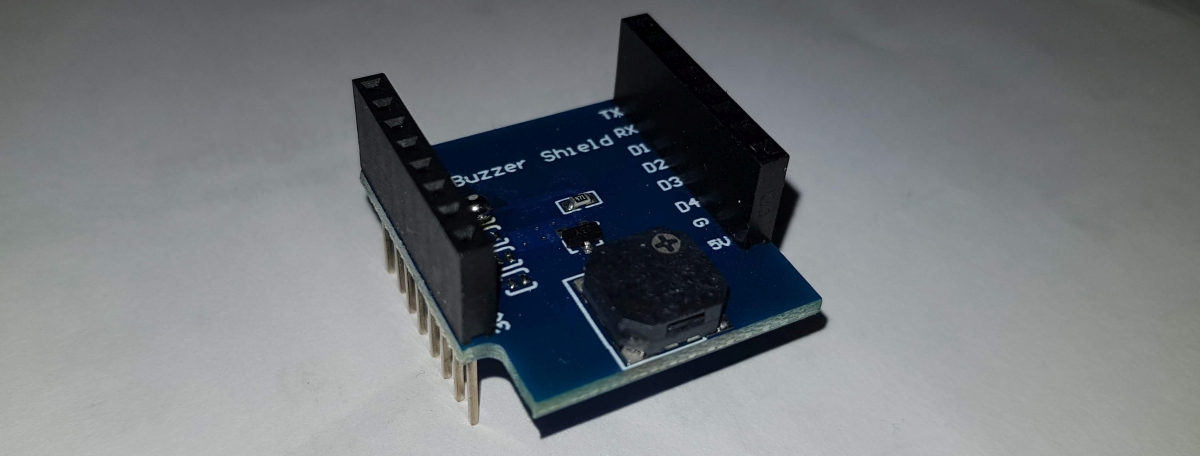
Mit Hilfe dieser Zusatzplatine können dem D1 mini ein paar Töne abgerungen werden.
For the D1 mini ESP8266 and ESP32, go here:
- Preview – W600-Pico V1.0.0 1MB FlashLink status: OK
- Wemos C3 MiniLink status: OK
- (Wemos) D1 ESP32Link status: OK
- Wemos D1 Mini Pro (V1.1.0)Link status: OK
- Wemos D1 MiniLink status: OK
Facts
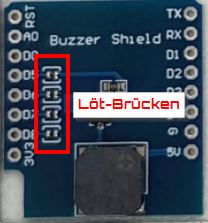
- Ein Buzzer, mehr nicht. Er kann mit den IOs D5 – D8 über eine Lötbrücke verbunden werden. Bei mir war keine Vorauswahl getroffen.
| Description | Name | D1 | D1 32 |
|---|---|---|---|
| Eingang Buzzer, abhängig von der gewählten Lötbrücke | BUZZER | D5 / D6 /D7 /D8 | GPIO 22/21/17/16 |
SchematicLink status: OK
Compatibility
| D1 Type | Compatible | Begründung, wenn nicht |
|---|---|---|
| D1 mini | Yes | |
| D1 mini Pro | Yes | Untested |
| D1 mini Lite | Yes | Untested |
| D1 32 | Yes | |
S2 mini | Yes | Untested |
| C3 | Yes | Untested |
Areas of application
- Signalgeber
- Alarm
- Warnton
- Tastaturrückmeldung
Views
Programming
Libraries
Es gibt Bibliotheken, die ganze Symphonien erlauben, für einen ersten Test ist aber keine nötig.
Arduino ESP32 Library V2.0.2
Arduino ESP8266 Bibliothek V3.0.2
Test programme
Ich habe das Testprogramm von Wemos verwendet und es etwas angepasst.
Source code BuzzerTest.ino (GitHubLink status: OK)
/** D1 Mini Buzzer Shield Test
 *
 *  Tested with
 *  D1 mini
 *  D1 EP32
 *
 *  Libraries
 *  only Arduino
 *
 *  Example based on:
 *  https://github.com/wemos/D1_mini_Examples/tree/master/examples/04.Shields/Buzzer_Shield/Do_Re_Mi
 *
 *  Enhanced By
 *  S. Fambach
 *
 *  Visit https://www.fambach.net if you want
 */

#define DUTY 512
#define OFF  0


#ifdef ESP8266
  // nothing to declare
#elif defined(ESP32)
  // define D5 pin for ESP 32
  #ifndef D5
    #define D5 18
  #endif


  // use first channel of 16 channels (started from zero)
  #define LEDC_CHANNEL_0     0

  // use 13 bit precission for LEDC timer
  #define LEDC_TIMER_13_BIT  13

  // use 5000 Hz as a LEDC base frequency
  #define LEDC_BASE_FREQ     0

#endif

// define buzzer port
int buzzer=D5;

// define Notes
// Note name: C6 D6 E6 F6 G6 A6 B6 C7
// http://newt.phys.unsw.edu.au/jw/notes.html
int freq[]={1047,1175,1319,1397,1568,1760,1976,2093};

// name notes
String note[]={"C6", "D6", "E6", "F6", "G6", "A6", "B6", "C7"};

void setup() {

  pinMode(buzzer, OUTPUT);


  #if defined( ESP32 )
    // init esp 32 pwm (rest is the same for esp8266 and esp32
    ledcSetup(LEDC_CHANNEL_0, LEDC_BASE_FREQ, LEDC_TIMER_13_BIT);
    ledcAttachPin(buzzer, LEDC_CHANNEL_0);
    ledcWrite(LEDC_CHANNEL_0, OFF);
  #endif

  digitalWrite(buzzer, LOW);

  Serial.begin(115200);
  Serial.println("Buzzer Test...");
}

void loop() {
  for(int i=0; i<8; i++){

// set the current frequency
#if defined( ESP8266 )
    // we have to set both i don't know why but without this it does not work
    analogWriteRange(freq[i]);
    analogWriteFreq(freq[i]);
#elif defined( ESP32 )
    ledcSetup(LEDC_CHANNEL_0, freq[i], LEDC_TIMER_13_BIT);
    ledcAttachPin(buzzer, LEDC_CHANNEL_0);
#endif

    // write some information on the console about the current note
    Serial.print("Note name: ");
    Serial.print(note[i]);
    Serial.print(", Freq: ");
    Serial.print(freq[i]);
    Serial.println("Hz");

    // turn tone on
#if defined( ESP8266 )
    pinMode(buzzer, OUTPUT); //?
    analogWrite(buzzer, DUTY);
#elif defined( ESP32 )
    ledcWrite(LEDC_CHANNEL_0, DUTY);
#endif
    delay(1000);

    // turn tone off
#if defined( ESP8266 )
    analogWrite(buzzer, OFF);
    digitalWrite(buzzer, LOW);
#elif defined( ESP32 )
    ledcWrite(LEDC_CHANNEL_0, OFF);
#endif

    delay(1000);
  }
  Serial.println("STOP");
  delay(5000);

}
Problems
Beispiel von Wemos funktioniert bei mir nicht mit dem ESP8266.
Das Beispiel entspricht zwar der Spezifikation, funktioniert bei mir mit der aktuellen (Version 3.0.2) Arduino Bibliothek nicht.
Ich musste zusätzlich auch immer noch die Frequenz setzen, damit das Programm bei mir seine Arbeit verrichtet.
    analogWriteRange(freq[i]);
    analogWriteFreq(freq[i]);
Conclusion
Tut, was es soll, für den Erfahrenen sehr unspektakulär, für den Anfänger ein Höhepunkt.
More posts
Other Shields
- D1 Mini Shield – Prototyp-PlatineLink status: OK
- D1 Mini Shield – RGB LED (Einzeln)Link status: OK
- D1 Mini Shield – RGB LEDLink status: OK
- D1 Mini Shield – PIR (Bewegungssensor)Link status: OK
- D1 Mini Shield – HR8833 MotorLink status: OK
- D1 Mini Shield – AT8870 MotorLink status: OK
- D1 Mini Shield – SG30 LuftqualitätsmessungLink status: OK
- D1 Mini Shield – I2C ConnectorLink status: OK
- D1 Mini Shield – Matrix LED ShieldLink status: OK
- D1 Mini Shield – Oled 64×48Link status: OK
More ESPs
- October Check 2026 – Neue Mikrocontroller und BoardsLink status: OK
- Ulanzi TC001 Smart Pixel ClockLink status: OK
- ESP WEB Serial LibraryLink status: OK
- ESP32-C3 Seeed Studio XIAOLink status: OK
- ESP32-C3 Super Mini BoardLink status: OK
- Preview – LuatOs ESP32-C3 BoardLink status: OK
- ESP32 Bluetooth GamepadLink status: OK
- ESP01 – DHT11 Temperatur und Feuchte Sensor PlatinenLink status: OK
- ESP01 Relay BoardsLink status: OK
- ESP8266/32 WiFi Manager.Link status: OK
Sources
Sources for the Shield
Manufacturer's websiteLink status: OK
SchematicLink status: OK
Datenblatt Buzzer MLT8540Link status: OK (Chinesisch)
Sources for the boards
Manufacturer's websiteLink status: OK
SchematicLink status: OK
CH340 USB DriverLink status: OK
https://arduino-projekte.info/wemos-d1-mini/Link status: OK
https://www.exp-tech.de/plattformen/esp8266/entwicklungsboards/8898/wemos-d1-miniLink status: Broken
| Date | Change | Author |
|---|---|---|
| 15.10.2026 | Beispielcode als Code-Block eingefügt (Einbettung über gist-it.appspot.com funktionierte nicht mehr) | Suffocation |
| 08.10.2026 | Überschriften-Hierarchie korrigiert (H1→H2, Unterebenen eine Stufe tiefer) | Suffocation |
| 04.10.2026 | Rechtschreibung korrigiert: Tippfehler, Kommas, Grammatik | Suffocation |
| 03.10.2026 | Log-Liste eingefügt | Suffocation |
| 11.04.2022 | Post created | Suffocation |